This article submitted by D_Ginther@hotmail.com and has not been tested at DIYAutoTune.com, but we greatly appreciate you Darin, for all your hard work!
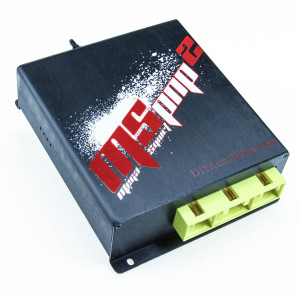
Looking for the easiest way to MegaSquirt these trucks? Since this article was written, we’ve come out with a MegaSquirt PNP for 22RE powered trucks. This is a fully assembled, plug and play ECU that fits 1985-1990 applications, including 22RTE. Toyota 22RE MSPNP installation instructions can be found here. This article covers the classic, roll your own approach.
Applications:
85-88 Toyota Pickup Truck / 4-Runner & 85 Celica (I believe)
The instructions for building the harness will work for all 22re trucks up to 1994/1995, but the connector diagrams are not the same.
Overview
This is a primer on how to connect your existing wiring harness to Megasquirt-I, PCB-3, using MS1/Extra. The theory is that it is possible to come very close to PnP (Plug and Play) this system designing an adapter harness – or splicing into the existing wiring. This guide is written for the 22RE, non-turbo, with a 3-connector ECU. It’s focused on removing the stock AFM and a setup to go turbo. It includes information for naturally aspirated 22RE also (minor changes). Certain 22RE’s did have 2 connector – this guide does not apply. Information can be applied to integrating the 22RTE, but I have not tested with this ECU.
Disclaimer
Incorrectly connecting Megasquirt to your existing wiring harness can damage electronic components that are expensive to replace. It is also possible to damage megasquirt. Use this guide at your own risk. Incorrectly tuning your motor can cause serious internal damage.
Also– if you haven’t already, please read the ‘disclaimer’ at the top of the parent page here.
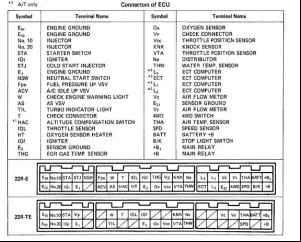
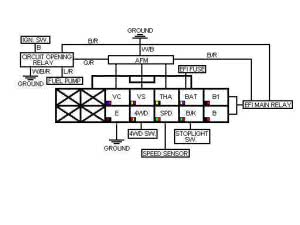
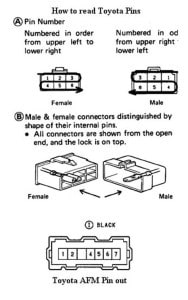
Overview of Toyota Connectors:
For the 22RE (not the 22RTE, which can be pinned out from the above):
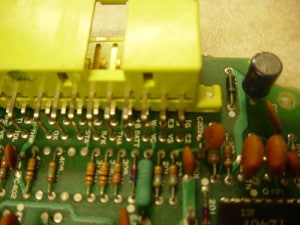
The way this looks in real life, with the connector removed (ECU Photo):
This photo is actually of a 2 connector 22re, but it shows the connector on the board.
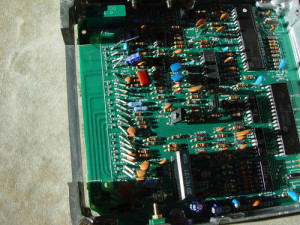
3-connector 22re board, with connector removed.
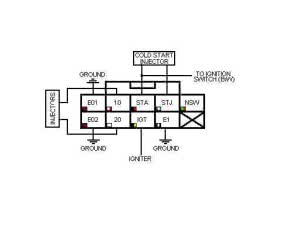
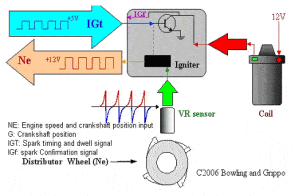
Overview of the Toyota Ignition system for the 22RE (and others) – VAST:
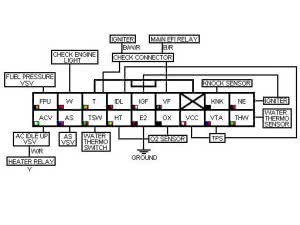
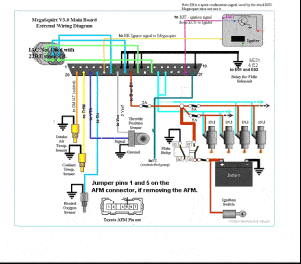
Overview of Megasquirt wiring for wiring megasquirt with VAST (22re)
Photos taken with permission from www.megasquirt.info
Required changes to Megasquirt:
The stock Toyota ECU uses a system called VAST to control ignition. This system allows the ECU to do complete timing control. It also means that there is a “black box” (igniter) between the distributor and the coil. As such, we have to make some very minor changes to the megasquirt system. I’m not going to go into the theory of WHY we need to make these changes (such as expected signal amplitude), but suffice to say that these changes need to be done, otherwise we can’t integrate with VAST.
Required changes:
For the ignition input:
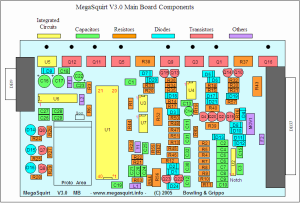
Install a 1k resistor between the right side (non-band) end of D1 and the left leg (banded end) of D9. This is for a 12V pull-up. Note: the “side” is critical here.
For the ignition output on LED14/Pin36:
Bring the ignition output from LED 14 (D14) to a pin on the DB37 connector.
Use a small piece of wire from LED D14’s leg that’s closest to the DB9, over to the hole labeled IGN at the opposing side of the board. This results in the ignition signal OUTPUT on pin 36.
A 5v pull up is required for this connection. Use a 250 ohm (200-250 ohm will work) resistor from either one of the two 5v sources on the board (they’re labeled +5v). Just above the proto area. Run the resistor into one of these +5v holes to the wire itself – or directly to the hole labeled IGN.
You’ll need the following diagram to help make these changes if you haven’t built it yourself:
Photo taken with permission from www.megasquirt.info
FAQ:
Q: What’s an IAC?
A: Idle air controller. The 22RE doesn’t have one. You don’t have to wire it in. It’s useful if you’re going to use other types of after market throttle bodies. IE the 5.0L Explorer throttle body has an IAC, but it won’t fit the 22re manifold without substantial modification.
Q: Do I need to wire in the fuel pump as shown above? A: No. The fuel pump can operate independently of megasquirt, if you’re retaining your AFM.
Q: Do I need to wire in the 02 sensor as shown above?
A: The 22re came stock with an 02 sensor is warm. You DO need to wire pin 23 of megasquirt to the “Ox” pin. For blown applications, you need to use a wideband. HT on the wiring harness needs to be grounded with the 22RE it’s preheat.
Q: Do I need an IAT?
A: Depends: you need an IAT (Air intake temperature sensor), but only if you’re removing the stock AFM (IE going turbo). Otherwise you can use the factory IAT. For replacement, most GM sensors will work. I recommend and open element sensor via one of the following vendors (~$21):
Click Here to view available Sensors
It’s 3/8 NPT. Strangely enough, if you remove the cold start injector from your manifold (you don’t use it with megasquirt) you can tap that hole with a 1/2 NPT tap. Use a 1/2in to 3/8in NPT adapter (available at any hardware store, pipe section) and screw you’re your new sensor in.
This sensor will require that an additional wire gets run from Megasquirt. You can’t use the Toyota harness.
You can use other sensors, but I recommend something with an open thermistor. The solid sensors tend to get heat soaked.
Q: Do I need an CLT (coolant temp sensor)?
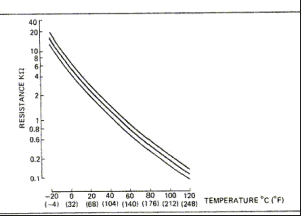
A: No. you can use the stock Toyota sensor (not the one on top of the manifold, which is used for the instrument cluster) you use the one in the manifold already. “THW”. It may require calibration, I’ll have to check on that. The resistance curve is listed below.
Stock Water Temperature Sensor
32 deg F = 6.02 Kohm
77 deg F = 2.080 Kohm
212 deg F = 230 ohm
Stock Intake Temperature Sensor
4 deg F 15 Kohm
32 deg F 5.5 Kohm
68 deg F 2.5 kohm
140 deg F .55 Kohm
So how do I hook all this up?
Ahh, you want me to do your homework for you eh? That’s ok…
- Pins 7, 8, 9, 10, 11, & 19, merge these together. We’ll call them merge A They’re all ground. At the stock connector E01, E02, E21, and E2, merge these together, we’ll call them merge B.Connect Merge A to Merge B.
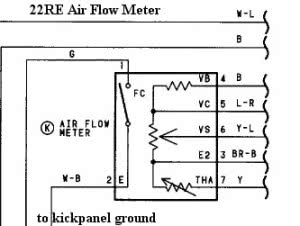
- Pin 20, IAT. Intake air temperature sensor. This goes to the GM IAT sensor that you installed in your upper plenum OR it goes to THA if you’re keeping your AFM. Note, we may need Easy Therm for the Toyota IAT.
- Pin 21, CLT. Coolant Temperature sensor. Note – we may need to configure this sensor in megasquirt – use Easy Therm: http://www.msefi.com/viewtopic.php?t=10308 Connect pin 21 to THW.
- Pin 22, TPS signal – variable output, Connect pin 22 to VTA.
- Pin 23, 02 Signal, Connect pin 23 to Ox.
- Pin 24, Igniter trigger to megasquirt. This is labeled as distributor on the Toyota diagram, but it’s a “conditioned” signal from the igniter. Connect pin 24 to Ne.
- Pin 25 is for an IAC, not used by Toyota. Not used.
- Pin 26 is for TPS Vref. Connect pin 26 to Vcc.
- Pin 27 is for an IAC, not used by Toyota. Not used.
- Pin 28 is switched 12V used to megasquirt. A 2A fuse is recommended. This may be redundant based on the 22re fuse box, but it’s still a good idea. Connect pin 28 to B or B1 (it doesn’t matter which).
- Pin 29 is for an IAC, not used by Toyota. Not used.
- Pin 30 is for an Fast idle control relay. It’s a switched ground. The 22RE has a VSV (variable speed valve) on top of the manifold, it’s used to open additional vacuum when the AC is on (provided 12v).You could use Pin 30 to power a relay to activate the VSV, but I’m going to assume we’re not going to do that. Not used.
- Pin 31 is for an IAC, not used by Toyota. Not used.
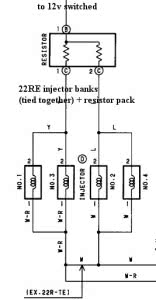
- Pins 32 & 33 can be used to pulse ground to injector bank “10” (injectors 1&2, I think). Note, if you’re using aftermarket injectors, it would be a good idea to check impedance from this pin. There may be a resistor pack. A resistor pack shouldn’t harm anything – but you need to correctly configure megasquirt for low or high impedance injectors. Connect pins 32&33 to “10”. (see my note below*)
- Pins 34 & 35. Not used.Fire another bank of injectors with these
- Pin 36 – ignition signal from megasquirt to the igniter.This controls the timing.Connect pin 36 to IGt.
- Last: (optional): The 22RE efi system uses a pre-heated 02 sensor.You can configure megasquirt to ignore the 02 sensor output until the engine is warm – usually this means the 02 sensor is warm enough also. The 02 sensor heater is switched to ignition. You need to ground it. As I prefer a “clean” signal ground to megasquirt, I prefer that you ground it to the exterior, rather than to megasquirt.Connect HT to a ground. I prefer to ground it near the MS case.
- Pin 37 -If you’re not using the AFM you do the following: use VC by jumping pins 1 and 5 on the AFM connector. (Pin1 = to activate fuel pump, Pin5 = VC = to MS fuel pump control) Connect pin 37 to VC. This grounds the circuit that activates the fuel pump. If you have an AFM, do nothing. The key should turn on your fuel pump. Another note, if you don’t want MS to control your fuel pump, you can simply jumper pins 1 and 2. This activates the fuel pump when the ignition is ON, but it may be a bad idea if you’re in an accident and a fuel line gets cut. The fuel pump will continue to run.
*technical note on the injectors for the 4runner/pickup: Although the wiring diagram indicates that there are 2 separate banks of injectors, Toyota owners indicate that the banks are tied together in the wiring harness near the AC compressor. This means that if we fire bank 10, we’re also firing bank 20. For megasquirt, it doesn’t matter – we’re going to “batch” fire them all anyway… And each “bank” can control up to 10 injectors. As such, we could have wired 32&33 to “10” and “20” respectively and leave a spare bank on megasquirt.
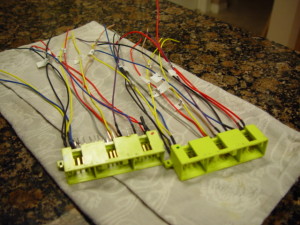
Soldered up ECU connector
This is what it looks like, just before being soldered to a DB37 connector on the MS side:
Configuring your spark settings:
Output Settings:
I have mine set to Distributor= MSnS — All the other code types are off.
For output pins, you have a choice of Fidle or LED17 (D14) — and which you use depends on how the board is moded.
On my v2.2 board I used fidle, but most people running the v3 board are using LED17/D14. The instructions you referenced in your first e-mail talk about modding the board so that spark output comes out of pin 36 via d14, which is why you’re running a jumper from d14 to the IGN hole.
If you go that route, then you set fidle to idle control and the LED17(D14) to Spark Output A.
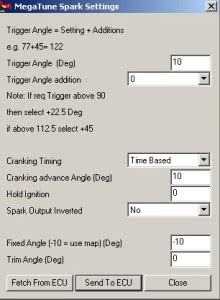
Note, this assumes you’re timed correctly initially with a base timing of 10 degrees BTDC.
Set your trigger angle to 10. Below 20, MSnS fires ignition in “next cylinder” mode.This means when it receives a pulse to NE it waits until the next signal before generating the pulse.
Cranking should be set to time based, but according to the MR2 gurus this doesn’t matter as the igniter controls ignition during cranking and doesn’t send a NE signal to the computer. This means no rpm signals while cranking.
Fixed angle set to 16 for static timing or -10 for MS controlled timing.
Verify that your base timing and that your advance works.. This is important.
Spark Output Inverted: NO (very important)
Trim Angle, Hold Ignition and Trigger Angle Addition all should be set to zero.
Dwell Control
The stock ECU controls dwell.Various Megasquirt gurus have scoped typical dwell to be between 2-4ms.Too short, and your motor willstuble. Too long and you’ll saturate your coil, which is bad.
Configuring your fuel settings:
Configuring base fuel and enrichments is beyond the scope of what I want to do today. With basic calculations included with megasquirt, you can get your ride running.
You can tune basically with a narrowband 02 (bone stock).
You’ll need to learn to “self-tune” using megatune.
Ping me directly for my fuel maps:
D_ginther@hotmail.com
Notes:
TPS needs to be wired to go from 0 to 5v (idle to WOT)
In brief:
Use MSnS spark output via the FIDLE output
Adapt the MS board using a 12v pull-up to the input and 5 v pull-up on the output.
Set trigger angle to 10 deg BTDC, which causes MS to fire in the “next cylinder” mode.
On the Spark Settings page, you set “Spark Output Inverted = NO”.
Dwell Control “ON”, with dwell set at 2-4 ms.
Be sure to use MegaTune 2.25p1 or later, with the appropriate S19 file.
