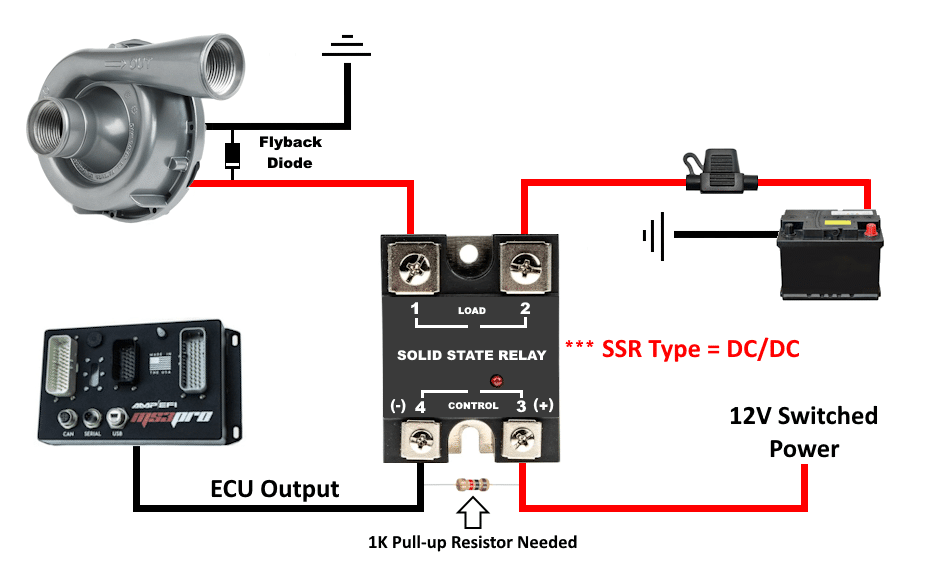
This article features water pump diagrams for electric water pump installations, including both high-side (recommended) and low-side wiring configurations. Follow these recommended diagrams to ensure proper control and reliable performance, allowing you to choose the setup that best fits your application and cooling needs.
High Side Method (Recommended) 
Products:
- Solid State Relay (SSR) DC/DC Style
- Flyback Diode
- Inline Fuse
- 1K – Sealed Resistor
Wiring:
- Pin 1 – Supplies Power to Pump
- Pin 2 – 12V Battery Power to SSR
- Pin 3 – 12V Switched Power to SSR
- Pin 4 – ECU Output to SSR
- PWM Out – Ground Trigger (Recommended)
- Hi-Current – Ground Trigger
- Injector – Ground Trigger
- Flyback Diode
- This needs to be installed across the (+) and (-) of the pump
- Recommended installed at the pump
- Pull-up Resistor
- This is installed between Pin 3 and Pin 4 on the SSR
Low Side Method
Products:
- Solid State Relay (SSR) DC/DC Style
- Flyback Diode
- Inline Fuse
- 1K – Sealed Resistor
Low Side Method Wiring:
- Pin 1 – Ground to SSR
- Pin 2 – Supplies Ground to Pump
- Pin 3 – 12V Switched Power to SSR
- Pin 4 – ECU Output to SSR
- PWM Out – Ground Trigger (Recommended)
- Hi-Current – Ground Trigger
- Injector – Ground Trigger
- Flyback Diode
- This needs to be installed across the (+) and (-) of the pump
- Banded-side to 12V
- Recommended close to the pump
- Pull-up Resistor
- This is installed between Pin 3 and Pin 4 on the SSR
