We will be going through the entire process needed within TunerStudio to set up a Programmable On/Off Output. In this example, we are specifically using the MS3Pro Evo ECU, however the same general process applies to all other MS3 ECUs, and the process is very similar for MS2 based ECUs.
A Programmable Output does what its name implies. An ECU output can be programmed to automatically turn on or turn off when desired conditions are met. In the below example, we will use the output High Current Out 1 to trigger a secondary fuel pump when desired conditions are met.
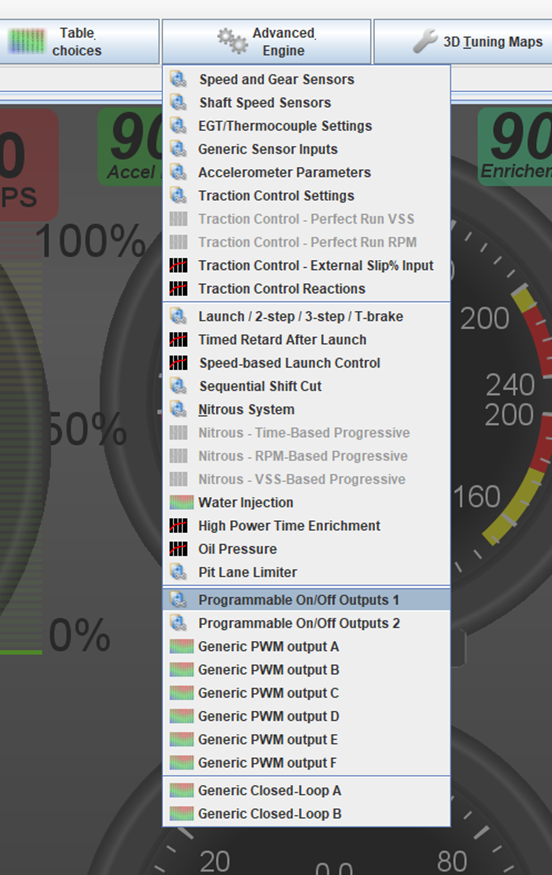
Step 1 – Navigate in TunerStudio to:
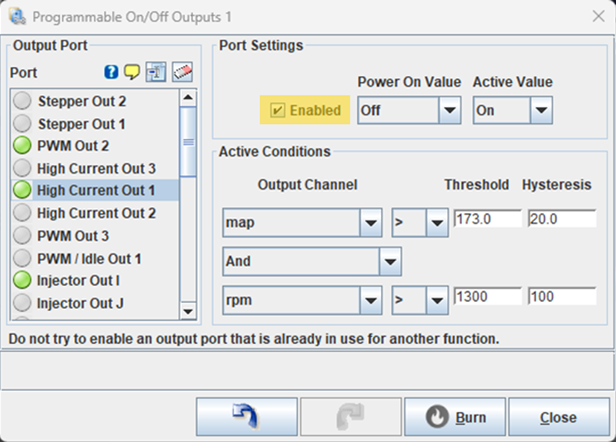
Step 2 – Select the Output Port you will be using. In this example we are using the below output port:
- High Current Out 1
- Select High Current Out 1 as our Output Port in the menu on the left, then click on “Enabled” under Port Settings
- Once Enabled is checked, the Port Settings and Active Conditions options below will become editable allowing you to program the output as desired
- Power On Value – this option sets if the output is On or Off when the ECU is first powered on
- Typically, this is set to Off
- Active Value – this option sets if the output is On or Off, once the Active Conditions below are met
- Typically, this is set to On

Typical Settings
How to use the Power On and Active Values:
- When you turn on the ECU and you want the Output Off and then Turn On after Active Conditions are met, set the values as:
- Power On Value = Off
- Active Value = On
- When you turn on the ECU and you want the Output On and then Turn Off once Active Conditions are met, set the values as:
- Power On Value = On
- Active Value = Off
In this example, we are going to be using the typical settings to turn on our secondary fuel pump when needed.
- Power On Value being Off means that the output will be off when the ECU powers up, so our secondary fuel pump is not running
- Active Value being On means that the output will be off until the Active Conditions are met. Once the conditions are met, the output will turn on and our secondary fuel pump will run.
Step 3 – Under what conditions do we want the Output to come on?
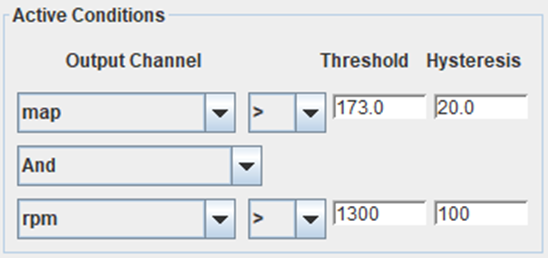
- Active Conditions – this section is where we set the conditions for the output change to become Active
- Output Channel – this is a variable from the ECU to be used to trigger the channel
- Examples: Map, RPM, Coolant Temp, etc
- Operator
- > (is greater than)
- = (is equal to)
- < (is less than)
- And/Or – this allows you to add an additional condition if desired
- And – this option makes the output channel active IF BOTH CONDITIONS are met
- Or – this option makes the output channel active IF EITHER CONDITION is met
- Threshold – the Output Channel is compared with the Operator against this value. If the condition is “true” then the output will become active
- Hysteresis – this is how much the value must move before the condition is “false”, consider this a deadband +/- this value where the condition will remain active
In this example we want the Secondary Fuel Pump to turn on when:
- map is > (greater than) 173
AND
- rpm is > (greater than) 1300
Both conditions (map and rpm) must be “true” to make the Output Active and turn on our fuel pump. Hysteresis is important, it will stop the Output from turning Off if the map is close to 173 we don’t want the output to turn on and off rapidly.
In this example, after it has been turned on, the Output will Not Turn Off until one of the conditions becomes “false”.
- map will become “false” when it drops below (Threshold – Hysteresis) 173-20 = 153 kpa
- OR
- rpm will become “false” when it drops below (Threshold – Hysteresis) 1300-100 = 1200 rpm
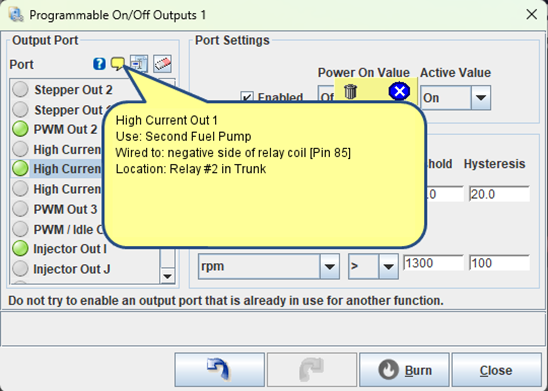
Step 4 – Leave yourself a note
It is common for projects to sit for periods of time, or older projects to be added onto or changed over time. You can use this feature to leave yourself a note on where you wired an output to and why. It is also useful to leave a changelog if you altered the Active Conditions.
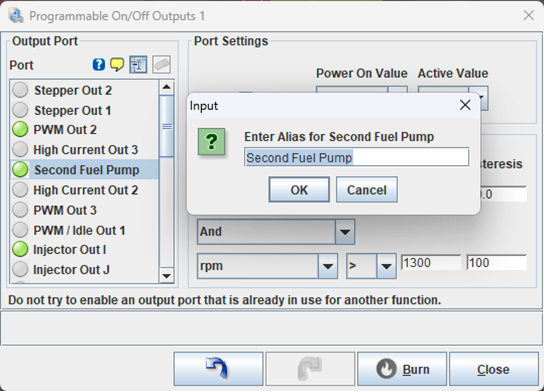
Step 5 – Create an Alias
You can rename the Output Port so that it is easy to find later we named this one Second Fuel Pump.
