Guest Blog Entry by Jeff Linfert
Jeff has been a long time user, reseller, installer, and tuner of our products for many, many years now and has offered up some of his thoughts and insights on how to help you get the most out of your car and engine management system. If you need installation or EFI tuning help and you can get your car to Florida, he’s a great guy to work with!

So you just got your MegaSquirt installed and it’s time to get it running and tuned.
But wait, the map that is on the ECU doesn’t perfectly match your car just yet. “What do I do now?” That’s what we are going to discuss.
Part 1: Plug and Play ECU models
DIYAutoTune sells a number of MS2 Plug and Play ECUs (MSPNP Gen2) and MS3 based Plug and Play (PnP) ECUs (MS3Pro PNP aka MSPNP Pro).
E30 BMWs and E36 BMWs, Fox Body Mustangs, Miatas, Nissan 240SX are just a few of the popular cars that have an available MSPNP Plug & Play Standalone Engine Management System available from AMPEFI and DIYAutoTune. They all come with some pretty good installation instructions and decent start up maps. However the start up maps are for pretty specific parts combinations and chances are it’s not exactly like YOUR car. (Generally the startup maps are built on fairly stock/unmodified cars so that you can tune from that single starting point to meet your needs)
Whenever I start a new project, be it my own or a customer’s, the very first thing I need to know is the primary use of the car. Is it a drag car, track day toy, endurance racer, dirt track or whatever? You need to know that because HOW you (or your tuner) actually sets up the final tune is dependent on it’s primary purpose. The details of that are a whole separate topic.
You’ll be using TunerStudio MS software to make the modifications to the start up map. The free Lite version is on the USB drive that came with your ECU. Get the registered version! MS3Pro PNP ECUs come with a coupon to upgrade to the registered version for free so no excuse for you guys. MSPNP2 users, PLEASE spend the $60 it’s well worth it.
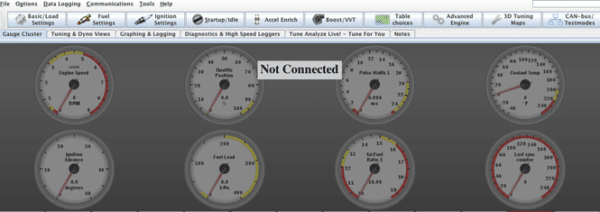
The first thing to look at is the tools menu….
This is where you update firmware and calibrate sensors. PnPs generally have the current release firmware and the correct calibrations loaded for coolant and air temp sensors. TPS calibration should be checked as should battery voltage and AFR table ( wideband O2 sensor ). Speaking of wideband O2 sensors. Don’t waste your time trying to tune without one . It’s like playing darts drunk, dizzy and blindfolded! Miata and forced induction guys you probably have a GM air temp sensor installed somewhere so be sure to calibrate air temp too.
On to the Basic/Load Settings menu.
This is where you set required fuel which is determined by fuel injector size, so unless you are running stock fuel injectors you will need to alter the required fuel. I also check the rev limiter settings and if it’s an MS3PRO PNP, the cooling fan on and off temperatures to make sure they are what I want ( I live in Florida so I’m often lowering the on and off values ).
Fuel Settings are next.
Fuel Injector deadtime/PWM: I’m a heretic here. Conventional wisdom and most tuners say that you absolutely, positively HAVE to have accurate dead time values. 14 years of tuning experience with Megasquirt ECUs says not so much unless you are running really large fuel injectors ( 1200 cc/min or bigger ). Running 1ms for high impedance and 0.7ms for low impedance works most of the time. The voltage correction curve is far more important but even that need not be perfect to get you running well enough to tune.
AFR and VE tables:
Setting up the bins on the X and Y axis to match your car’s operating range is something I feel is super important. For example, the car is a naturally aspirated Porsche 944 than runs enduros but the start up tune that came with the ECU is set up for a 944 Turbo, you’re wasting resolution that could be used to make the car run better/smoother. Going the other way, if the start up map only goes to 100kpa (naturally aspirated) and your car is turbocharged and makes 15 psi boost the tables MUST match or you are very likely to damage your engine. Fortunately the registered version of TunerStudio has a tool to make this easy.
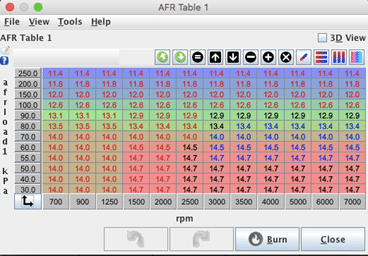
Notice the double arrow in the lower left hand corner of the AFR table? Clicking on that allows you to reset the load and rpm bins and rescales the table for you. It works really well when you go from high load values to lower ones or lower the peak rpm. If you go the other way it won’t rescale larger so there is still some work to be done to get the tables right but that can be done when you are actually tuning the car.
But what about the load and rpm break points? If you look at the table above you’ll see the break points are fairly even. Rpm points are close together at low rpms and load points are wider above 100kpa. I typically set things up this way because it tends to be easier to control idle and low speed driving with more rpm resolution and because most engines are pretty linear when boosted you don’t need as much resolution above 100kpa.
What about the values in the VE and AFR tables? Other than adjusting bins above the original load and rpms maximums I leave things alone. This is a PnP ECU…. The startup map that came with it is pretty darn good as I mentioned, don’t make more work for yourself ( or your tuner ) than is necessary.
Ignition Settings
Once again you’ll want to adjust the load and rpm min/max to match the car’s operating range using the rescale feature. I usually duplicate the load and rpm break points used by the VE table if the ECU is a PnP Pro with it’s 16×16 ignition table or the AFR table if it’s a PnP2 which has a 12×12 ignition table. If your car has a non-standard ignition trigger, you will need to set it correctly in the Ignition Options/Wheel Decoder sub menu. Examples of this include Miata 36-2 which is often used on “built” 99-05 Mazda Miata’s and Toothed Wheel if you upgrade a 5.0 Fox body Mustang to the late model Explorer 36-1 crank trigger.
Now it’s on to the Startup/Idle menu.
I usually make a fair number of changes here beginning with the Startup/Cranking settings. Cranking RPM should be set between 300 and 400 as a good rule of thumb. Clear Flood TPS% should be set to 70% or higher and be careful if you have a car without a variable TPS like a 1990-1993 Miata. You’ll probably want to set it to 100% for them because the TPS value may “float” and accidentally cause a no start.
Priming Pulse, Cranking Pulse, ASE settings and Warm up Enrichment all use 2D tables that are temperature dependent. How these are set should be based on where the car will be used. For example I live in Florida and rarely see the temperature drop below 50 degrees F. If I’m setting up a car that probably won’t leave the state, I set my minimum temperature to 20 degrees or so. The maximum should always be somewhere between 160 and 200, whatever the engine’s “normal” operating temperature is.
Idle Cranking duty is another temperature dependent 2D table. No need to have it set to -40 if it rarely freezes where you live. If idle control is set to open loop/warm up then you will want to adjust the Warm up Duty table. If you are using closed loop idle, tweak the Closed-Loop Idle target RPM curve.
Acceleration Enrichment can be left alone for now.
Boost/Advanced menu ( MS2 )
Regardless of whether or not you are using boost control, be sure to open the Boost Control sub menu and check overboost protection. On a naturally aspirated car it can be turned off. If the car has a supercharger or turbo, set it 10kpa or so above your desired boost level. For example: Your supercharged Terminator Cobra runs at 170kpa peak or about 10psi of boost. Set overboost protection to about 180kpa. I normally use BOTH fuel and spark cut.
Programmable outputs
This is where you control an electric cooling fan with a MSPnP2. The threshold is when the fan turns on and hysteresis is how many degrees BELOW threshold the engine temperature needs to be for the fan to turn off. I normally set fan threshold/on between 180*F and 190*F and hysteresis/off 3-5 degrees lower. If you don’t want the fan to come on with the key off set an additional AND condition of RPM > 500.
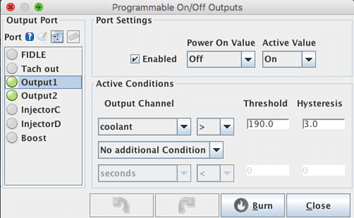
MS3Pro ECUs have a number of additional features and so have a Boost/VVT menu and an Advanced Engine menu. You will still want to check overboost protection. VVT, I typically leave alone until the car is running.
Programmable Outputs is in the Advanced Engine menu. This is where you will find settings for secondary cooling fan control if there is one, but in general I don’t worry about most of the features in this menu until I have the engine running. The final thing I like to do is go through and check for unused features and turn them off. No A/C? Then A/C idle up isn’t needed. Not interested in launch control? Turn it off. Doing this can prevent potential configuration errors and even take a little load off of the processor.
Part 2: Wire in MegaSquirt ECUs
Wire in Megasquirt ECUs come in 2 basic flavors, DIY MegaSquirt ECUs and the polished and professional grade MS3Pro ECUs. While there are some differences between them, they all have a similar base map that is loaded when firmware is installed and this time it’s VERY generic. This segment is going to assume that the ECU has already been wired up and all of your outputs have been chosen so that there are no conflicts. The biggest pitfall here is with PWM outputs. The PWM capable outputs are grouped and the groups must share a common PWM frequency. So make sure your PWM IAC either uses the same frequency as boost control and VVT or that the outputs are in different groups.
The easiest way I have found to build a good start up map from the generic base map is to start with a list.
- Engine displacement
- Engine redline
- Max load
- Fuel Injector size
- Sequential fuel?
- Ignition trigger type ( distributor, generic toothed wheel, native pattern etc… )
- Ignition type (single coil, wasted spark, COP etc… )
- Additional features used. ( IAC, Boost control, fan control, VVT, VICS etc… )
Sensor Calibrations
Then once again I start in the Tools menu with sensor calibrations. It’s also a good first check that my wiring is good. If I can connect to the ECU and the sensors are reading correctly in the Tuner Studio console, the basic wiring is probably OK. Don’t forget MAP sensor calibration especially with a DIY ECU.
The Basics….
Then on to Basic/Load Settings to set required fuel, sequential settings, rev limiter, fan control if needed ( MS3 only ) and this time we must open the General Settings sub menu and choose what type ( if any ) barometric correction we want. Keep in mind that full time barometric correction requires a dedicated baro/map sensor. MS3Pro ECUs have both a 4 bar MAP and a dedicated baro sensor. The only other thing I check at this time is the “include AFR target” feature. I make sure it is turned on.
Fuel Settings
As with the PnPs I usually use 1.0 ms dead time for high impedance fuel injectors and 0.7 ms for low impedance fuel injectors. When setting the AFR target table, I scale for the engine’s max load and rev limit and then I review the values in the bins. The AFR table below is typical of what I start with for most naturally aspirated road race cars. It often changes over time as I develop the tune for the car. Notice that the only sharp transition is between 1000 rpms and 1500 rpms. Engines work best with smooth transitions be it fuel or spark.
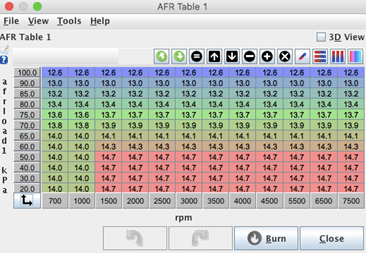
VE / Fuel Table
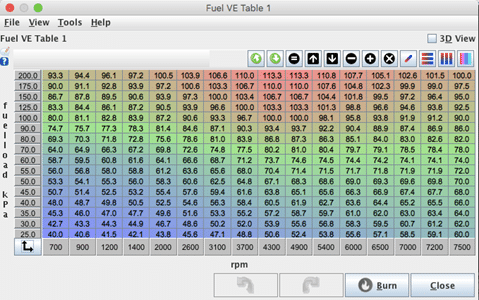
Setting up the VE table is next and as with the PNPs the rescale and interpolate double arrow is your friend. As a alternate method you can use the VE table generator. It’s found in the Tools menu on the VE table. The VE table below started out as the default table after loading MS3 firmware V1.5.1 which is the current release. Once again notice that the transitions are smooth. You can use the 3D view to double check.
Ignition Settings
First stop is the Ignition Options/Wheel Decoder sub menu. This is where we select our Spark Mode ( input ), Capture edge, Spark output, Number of coils and Spark hardware. MS3Pro ECU’s will use Going High as the spark output always and Spark as the hardware most of the time.
Example: You just got done swapping and wiring an early 4.8L LS engine in your 240SX using an MS3Pro EVO. Spark Mode would be LS; Capture edge, Falling Edge; Spark output, Going High; Number of coils, COP; and Spark hardware would be Spark.
Ignition Table (Spark Advance)
Moving along we now need to set up the ignition table. As always start by rescaling the table to the load and RPMs your car operates at. Now comes the important part. How much advance should I run? My rule of thumb for timing is start soft and tune on the dyno or at the track ( using lap times or trap speeds ) to find what the engine wants. The best way is on a dyno. As a very rough rule of thumb older designed engines like classic muscle car V8s will need more advance than newer engines, Overhead cam multivalve engines need less than wedge engines with only 2 valves and twin plug engines really don’t like lots of advance. Here are my normal starting points. Multivalve 24*-26*, old school V8 34*-36*, Modern 2V ( LS and others ) 28*-30*, Twin plug 6*-8* less than a similarly designed single plug engine. Note that these are my normal starting values for 100kpa from roughly 3000rpms to red line. And remember we are just trying to set up a tune that is good enough and safe enough to start the car, have a fairly stable idle and drive onto a trailer so it can be fully and properly tuned.
If your car has a turbo or supercharger, you will need to reduce timing as boost increases. The old rule of thumb that suggests reducing timing by 1 degree per 1psi boost is a good, safe start point.
Startup/Idle Menu
Once again you will want to adjust Priming Pulse, Cranking Pulse, ASE and Warmup Enrichment to match your climate. Idle settings are a bit trickier. But start out using open loop/warmup. You’ll be using cranking and warm up steps with a stepper IAC and cranking an warm up duty with a PWM IAC. PWM will also need an operating frequency. Bosch/German IACs generally like 90-150Hz, Ford 150-250Hz and Asian cars 200-500Hz. No matter the type of IAC adjust the 2D cranking and warm up tables as you did with the other start up settings The default duty cycle/step values can be used ( after adjusting the temperature curve ).
Boost/Advanced ( MS2 ) and Boost/VVT and Advanced Engine ( MS3 ):
Set up overboost and any cooling fans in the same way as a PnP, and go ahead and set up the correct inputs and outputs to control any of the additional functions that you will using such as VVT, Launch control, Boost control and Vehicle Speed.
At this point you’re ready to test the outputs and attempt to start the car. We will be covering that in the next installment. Stay tuned!
Opinions expressed within this guest blog post are solely the author’s and do not necessarily reflect the opinions and beliefs of the website or its affiliates
More EFI Tuning Articles to check out!! Knowledge is Power!
The EFI Tuners Guide – Learn How Electronic Fuel Injection and Ignition Systems Work!
EFI Tuning Tips for Pro Results! 5 Key Tuning Tips to factor into your process before you touch that keyboard!!
What is the difference between launch control and antilag?

